# Upgrade Guide
# 3.x to higher 3.x
# 1. Close the Unity Editor
Before initiating the upgrade process, please ensure that you exit the Unity Editor.
# 2. Remove Obsolete Files
Navigate to your Unity Project files and delete the folder: Assets/FrameplaySDK/Native
# 3. Open the Unity Project in Safe Mode
- Open your Unity Project. Unity will prompt you to Enter Safe Mode (opens new window) due to the temporary missing references. Unity automatically exits Safe Mode when you have resolved all the compilation errors
- Select Enter in Safe Mode
# 4. Import the Upgrading Frameplay SDK
- Download the latest version of the Frameplay plugin from the downloads page (opens new window)
- Drag and drop the .unitypackage into the Project Window and select Import. This will automatically resolve any compilation errors
# 3.x to 3.8.1
- Follow 3.x to higher 3.x above.
- Delete
Assets/FrameplaySDK/Engine/Plugins/Android/WebViewPlugin.java. See Key Changes for reason.
# 2.x to 3.x (12-09-2023)
If you have configured an Instanced Override (opens new window) of a Prefab containing an Ad Space Game Object, please follow this prerequisite step
# 1. Remove Obsolete Files
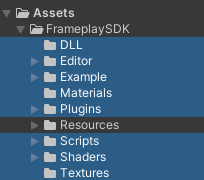
Delete the following folders from your project: FrameplaySDK/DLL, FrameplaySDK/Editor, FrameplaySDK/Example, FrameplaySDK/Materials, FrameplaySDK/Plugins, FrameplaySDK/Scripts, FrameplaySDK/Shaders and FrameplaySDK/Textures. Compile errors and missing assets will be fixed by the updated asset.
# 2. Import the Updated SDK Asset
- Download the latest version of the Frameplay plugin from the downloads page (opens new window)
- Open your project in the Unity editor.
- Select Assets > Import Package > Custom Package and locate the FrameplayPlugin.unitypackage.
- Make sure all files are selected and click Import.
# 3. Update Project Data
- Select the editor menu
Frameplay > Upgrade Frameplay Project Data - Select the editor menu
Frameplay > Developer Settings
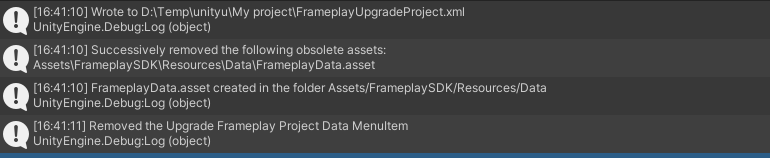
This completes the SDK upgrade. After successfully upgrading your project, the following logs will appear in the Console:
# 4. (Additional) Update Script References
If you have customized your integration with Frameplays API, you may need to update your scripts. The Frameplay SDK is now initialized by calling Frameplay.Session.Start(). We have provided an example script FrameplaySDK/Example/Scripts/FrameplayStartSession.cs that will initialize the SDK and register the in-game camera.
Please update your references to the Frameplay API. Full API details can be found here
# TroubleShooting
If you encounter any issues while upgrading the SDK, please contact our Integration Team for support. Please attach the FrameplayUpgradeProject.xml file located at the root of your project.