# Unreal Engine Quick Start
This guide will show you how to integrate the Frameplay plugin into your Unreal Engine project.
We officially support:
- Unreal Engine versions: 4.23 to 5.1
- Platforms: Windows, Mac, Android, iOS, PlayStation 4, PlayStation 5
# Prerequisites
To get started you must first have created:
- A Game Developer Account (opens new window) on the dashboard.
- And a New Game (opens new window).
# Getting Started
# Download and Install the Frameplay Unreal Engine Plugin
- Download and unzip the
Frameplayfolder from our downloads page (opens new window) - Navigate to your Unreal Engine project root directory (this folder contains the
.uprojectfile) - Creating a
Pluginsfolder - Copy the downloaded
Frameplayfolder into thePluginsfolder
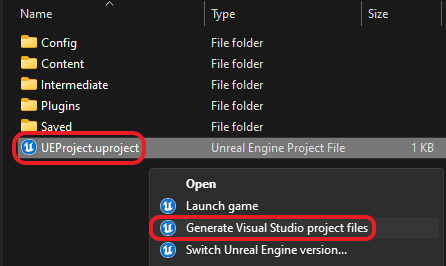
# Generate Visual Studio Project Files for Code Projects
If you are using a Code Project you must generate Visual Studio files. If you care using a Blueprint Project please skip this step.
- Right click the project's
.uprojectfile - Select "Generate Visual Studio project files"
See
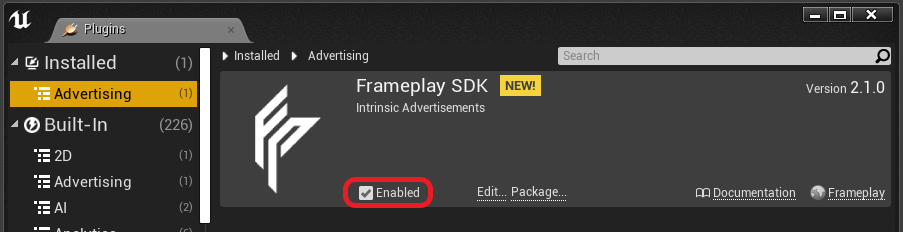
# Enable the Frameplay Plugin
Confirm the Frameplay plugin was successfully installed into your project.
- Launch the Unreal project
- Navigate to Edit > Plugins
- Confirm the Frameplay Plugin is enabled
See
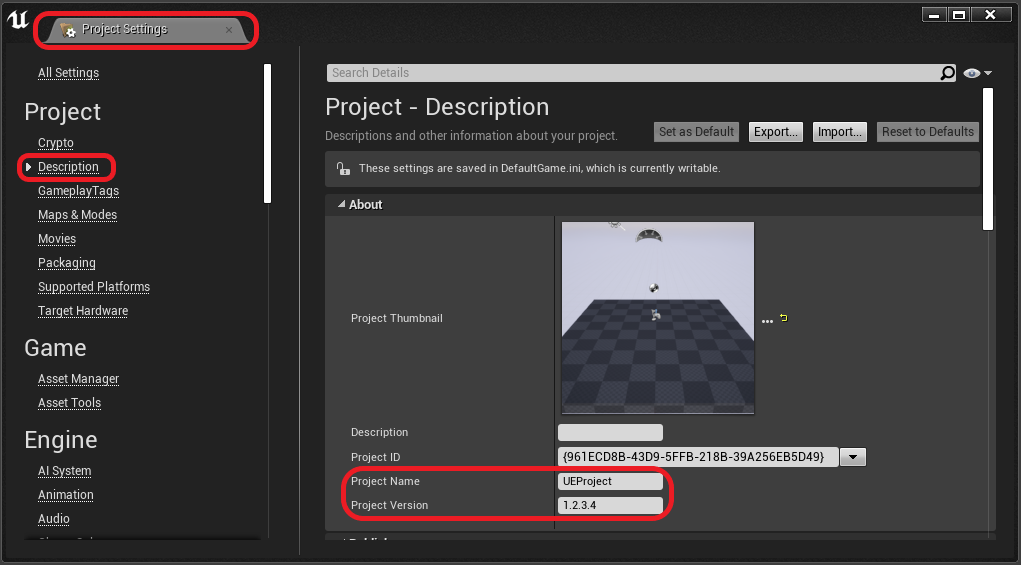
# Configure Project Name and Version
Confirm your Project Name and Version have been entered into the Project Settings.
- Navigate to Edit > Project Settings
- Select Project > Description
- Enter your Project Name and current Project Version
# Configure the Frameplay Developer Settings
The Frameplay Developer Settings are used to maintain the link between your Unreal project and the Developer Dashboard.
- Select the Frameplay Toolbar icon > Developer Settings

- Enter the Developer API Key and Game ID with the corresponding values found on your Game Page (opens new window)
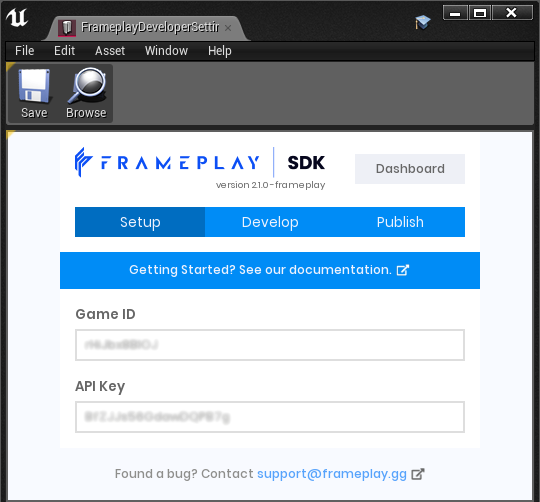
Find out more about the Developer Settings here
# Initialize the Frameplay SDK
- Initialize the Frameplay SDK by calling the method:
UFrameplayFunctionLibrary::Start_Session(). This will create a secure runtime connection to the Frameplay servers. - Configure the
playerparameter with the current player details. (If available, the players Age and Gender should be passed as parameters. These can be sourced from a client API or a custom login) - Set the
Allow Data Collectionplayer parameter. This corresponds to the respective platform signalLimit Ad Tracking.
# Blueprint Example
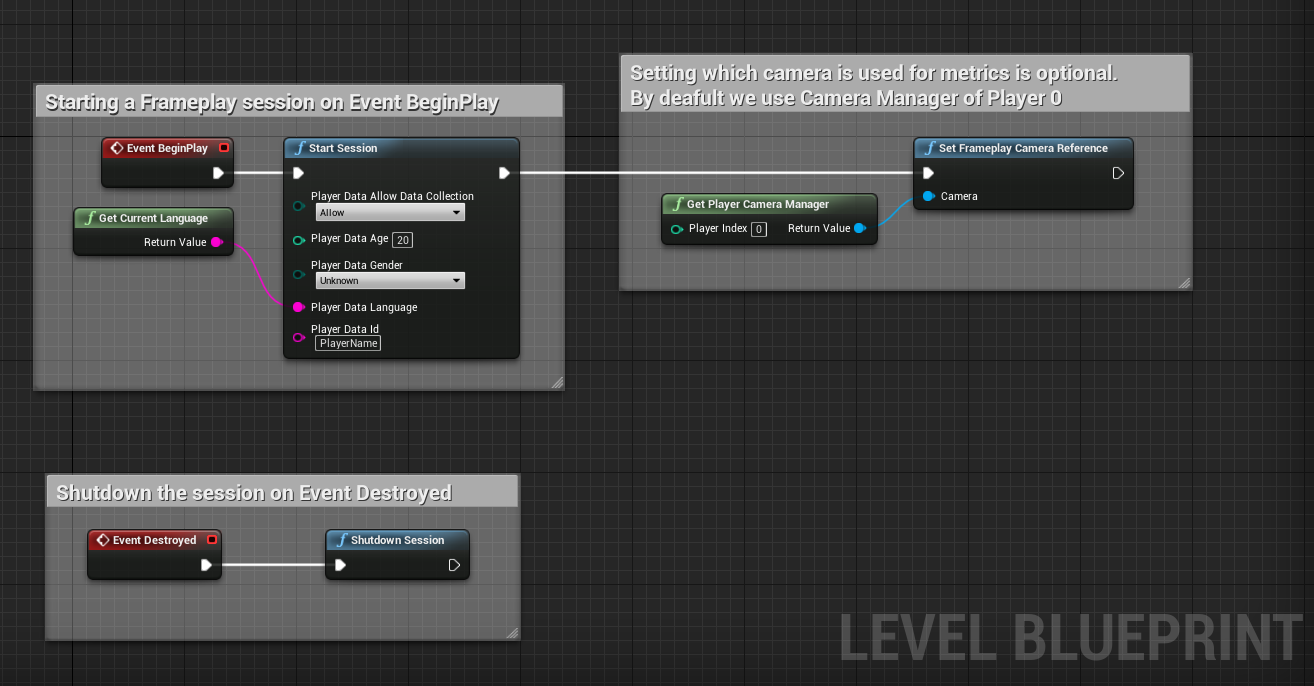
The Frameplay Session requires knowledge of the active Camera to use for measuring viewability. More information on Registered Cameras
# Code Example
# Header File
// EXAMPLE HEADER FILE (.h)

#pragma once

#include "CoreMinimal.h"
#include "GameFramework/Actor.h"
#include "Frameplay/frameplay_wrapper.h"
#include "AExampleInit.generated.h"

UCLASS()
class UNREALPROJECT_API AAExampleInit : public AActor
{
    GENERATED_BODY()

public:
    // Sets default values for this actor's properties
    AAExampleInit();

protected:
    // Called when the game starts or when spawned
    virtual void BeginPlay() override;
    virtual void EndPlay(const EEndPlayReason::Type EndPlayReason) override;
};
# Source File
// EXAMPLE SOURCE FILE (.cpp)

#include "AExampleInit.h"
#include "FrameplayFunctionLibrary.h"

// Sets default values
AAExampleInit::AAExampleInit()
{
    // Set this actor to call Tick() every frame.  You can turn this off to improve performance if you don't need it.
    PrimaryActorTick.bCanEverTick = true;
}

// Called when the game starts or when spawned
void AAExampleInit::BeginPlay()
{
    Super::BeginPlay();

    //Capture player data
    const FPlayer_Data Player{UData_Collection::allow, 20, EFrameplayGender::unknown, "en", "newPlayer"};

    //Start SDK
    UFrameplayFunctionLibrary::Start_Session(Player);
}

void AAExampleInit::EndPlay(const EEndPlayReason::Type EndPlayReason)
{
    Super::EndPlay(EndPlayReason);
    UFrameplayFunctionLibrary::Shutdown_Session();
}
# Build.cs File
The Build.cs file controls access to Unreal Engine modules and can be found here: [PROJECT_ROOT]/Source/[PROJECT_NAME]/[PROJECT_NAME].Build.cs. You will need to add Frameplay as a public dependency.
// EXAMPLE BUILD.CS FILE (.Build.cs)

using UnrealBuildTool;

public class UnrealProject : ModuleRules
{
    public UnrealProject(ReadOnlyTargetRules Target) : base(Target)
    {
        PCHUsage = PCHUsageMode.UseExplicitOrSharedPCHs;

        // We add "Frameplay" to the end here!
        PublicDependencyModuleNames.AddRange(new string[] { "Core", "CoreUObject", "Engine", "InputCore", "Frameplay" });
    }
}
More information on Frameplay Sessions
More information on the Frameplay API.
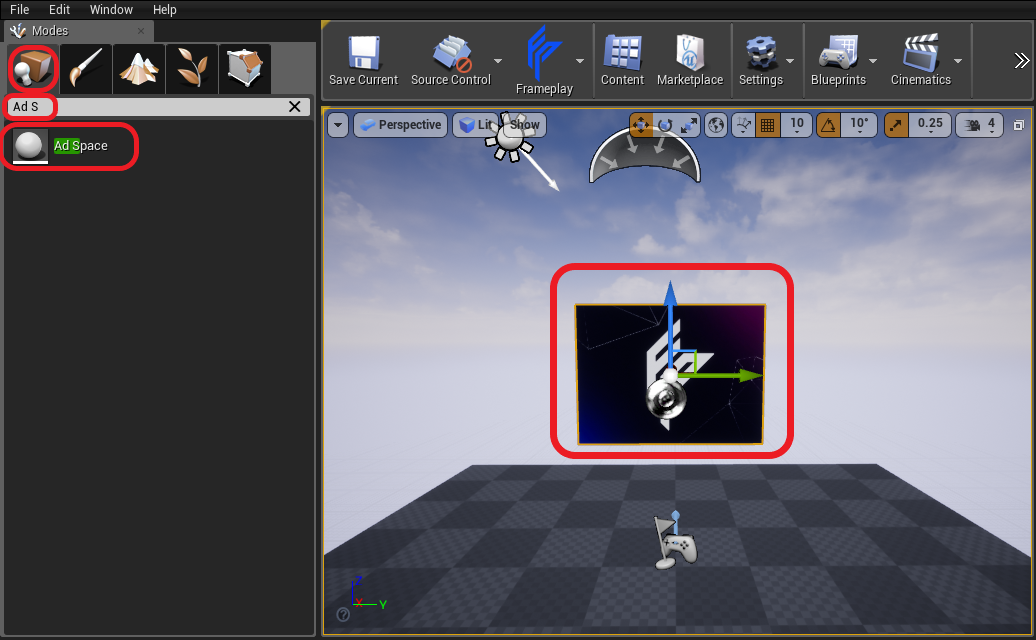
# Create an Ad Space
An Ad Space is an Actor that displays intrinsic advertisements to the player. They can be created through the editor Place Actor menu or in a Blueprint.
- Using the Place Actors Mode, drag and drop a Frameplay Ad Space Actor into the Viewport
- Reposition and scale the Ad Space to fit your environment.
# Configure an Ad Space
- Select the Ad Space in the World Outliner to view it in the Details panel
- Enter a unique name for the Ad Space
- Select your preferred ratio to best fit your environment
- Optional: select
Synchronize Ad Spaceand enter aChannel Nameto begin creating a group of Synchronized Ad Spaces that render the same advertisement.

# Load a Mock Advertisement
Begin Play In Editor Mode. This will trigger the Frameplay session to start and load a mock advertisement.
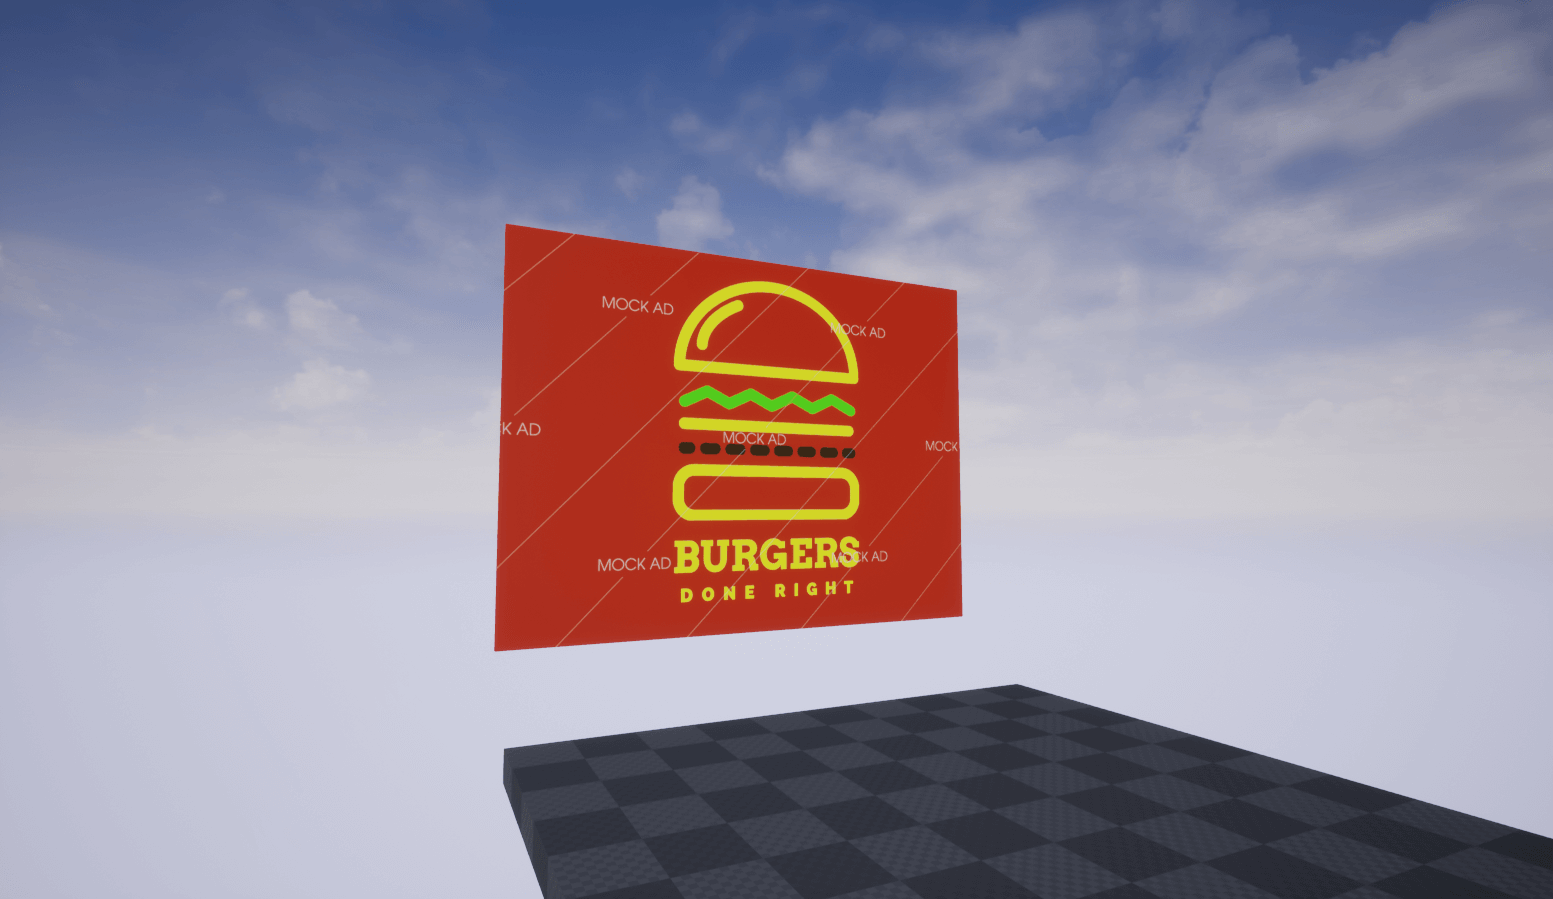
Congratulations! You have created your first intrinsic advertisement.
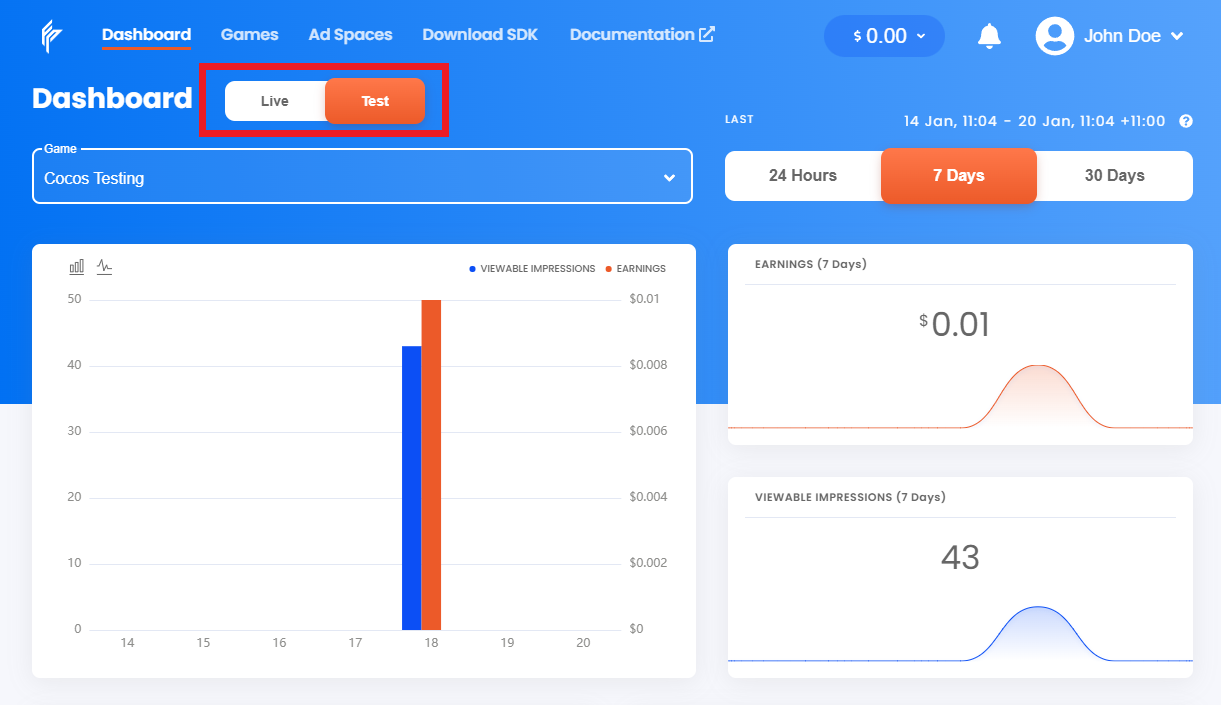
# View Impression Data
Sessions started in-editor and in development builds will automatically run in Test Mode. This means that only mock advertisements will be displayed.
Impression data gathered in Test Mode will display on your games Test Dashboard (opens new window).
# Packaging Builds
Before monetizing your final build, you must first submit your account and game for approval on the Frameplay Platform:
- Submit Developer Account for approval (opens new window)
- Submit Game for approval (opens new window)
Please allow 48 hours for approval. Advertisements will not load in Production builds until both your account and game is approved.
To package a final build:
- Select File > Package Project > Build Configuration.
- Confirm Shipping mode is selected.
At this time our integration team will contact you and notify once approved.
# Best Practices
We highly recommend you check out the Best Practices Guide to maximize revenue, impression quality and user experience!
# Troubleshooting
If something went wrong along the way, check the console for logs and visit our FAQ.